


How To Make A Floral Fascinator
A Guest Tutorial by Françoise Weeks
Small fascinators are a fun alternative to the more traditional flower crowns.
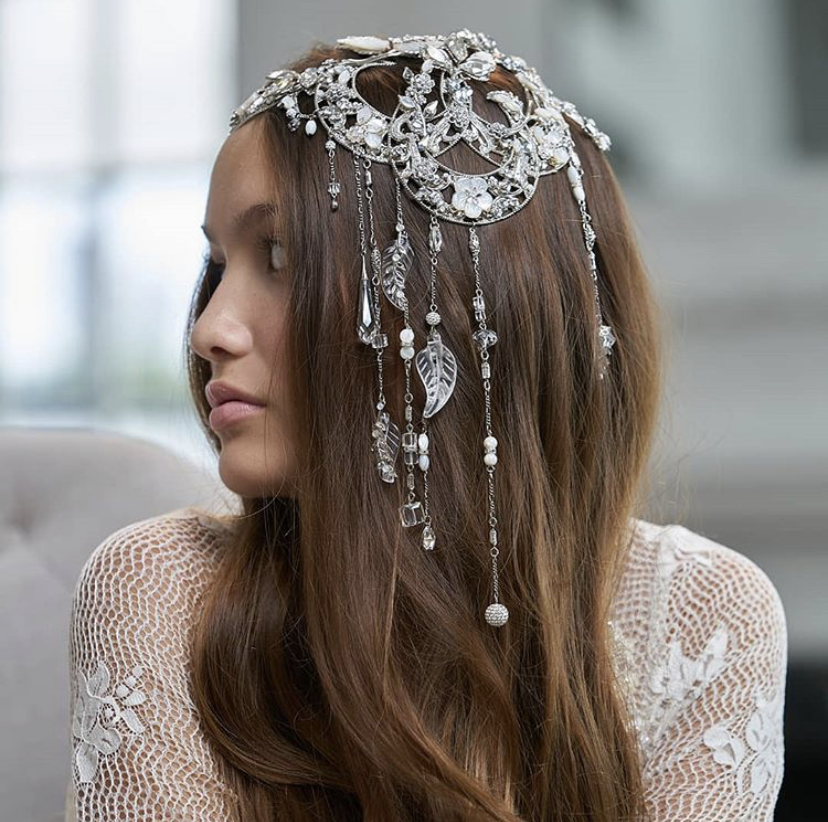
Inspired by the piece of jewelry pictured below which was designed by Maria Elena Headpieces as a hairpiece, I tried different ways to create a base for a fascinator, emulating this idea. After experimenting with different types of wires to create the small crescents, I settled on using pipe cleaners for a few reasons: they are super flexible, which makes it really easy to mold the fascinator perfectly to the head, they are soft to the touch and easy to manipulate and most importantly, it is a great gluing surface.
Since making the first one a couple of months ago, I have made some changes to the way I originally made the base and wanted to share this simple and inexpensive way to design a floral fascinator. And of course, these fascinators can be made in any size and the pipe cleaners can be connected in any configuration.
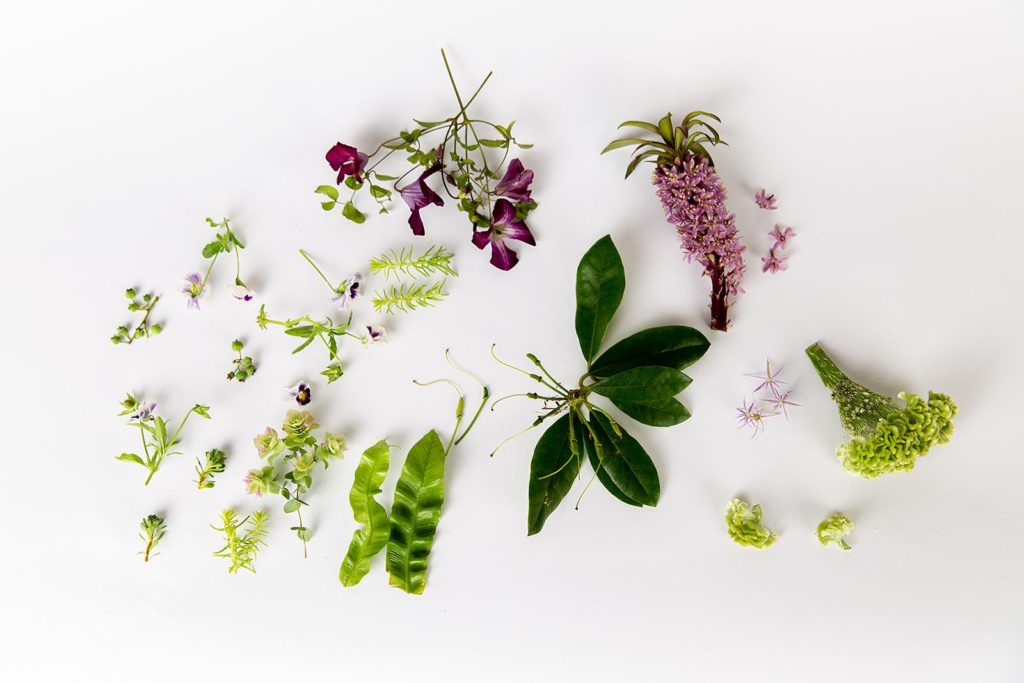
Examples of small flowers, blossoms and textures to use:
- Small flowers: pansies, clematis, honeysuckle, columbine, muscari, hellebore, fritillaria meleagris, lavender, sweet peas, small cymbidium or phalaenopsis orchids (partially deconstructed)
- Blossoms: delphinium, eucomis (pineapple lily), allium, hyacinths, kangaroo paws, kalanchoe
- Textures: any kind of berries, sedum, small succulents, small seedpods, small dried mushrooms, acorns
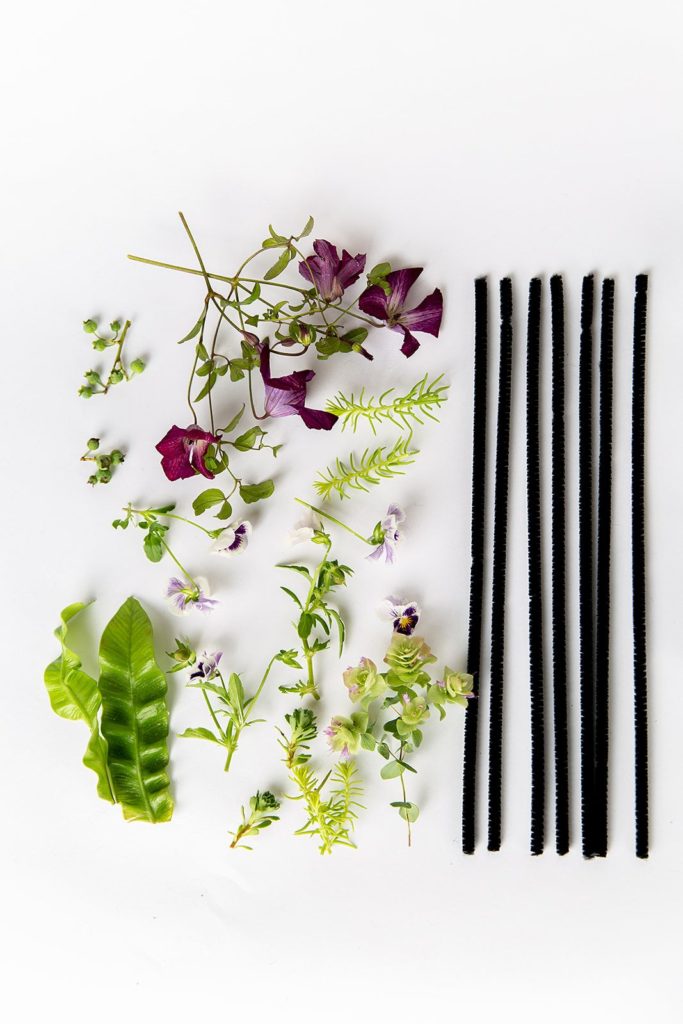
For this design I used:
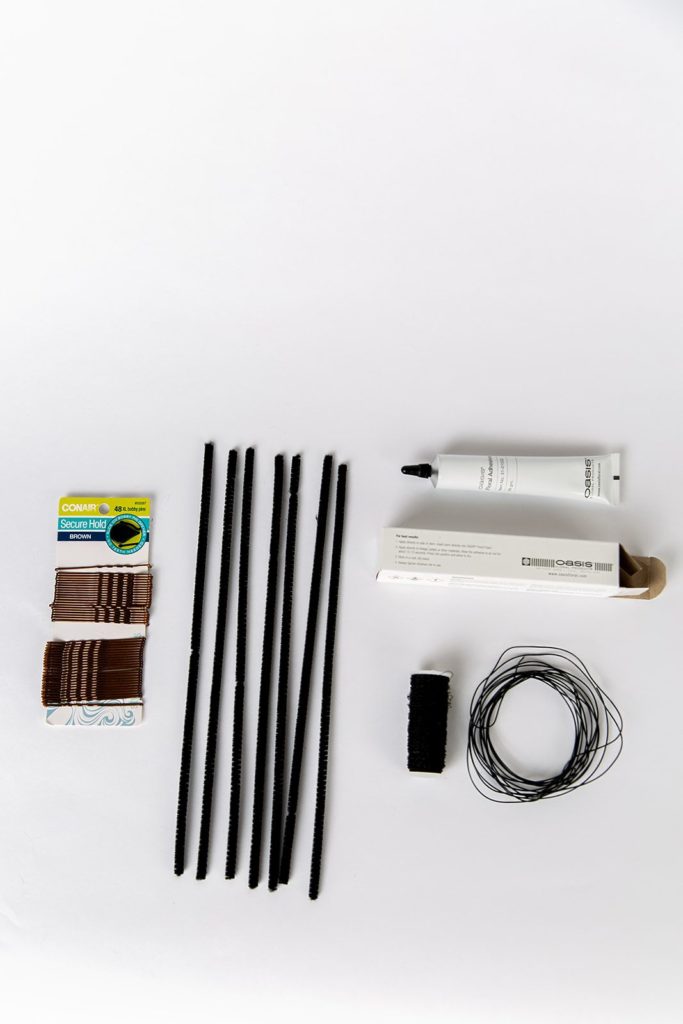
Supplies
-
- 7 pipe cleaners
- bullion wire (from Oasis or any other thin wire)
- a bit of thin wire (aluminum wire from Oasis or 26 gauge wire or any thin wire you have on hand)
- floral adhesive (from Oasis)
- 4 hairpins
Botanicals
-
- 8 stems of bird’s nest fern (I bought 4″ plants, the leaves were about 4-6″ long)
- blossoms of eucomis and allium christophii
- small clematis
- pansies
- kent oregano
- blueberries
- sedum
- small pieces of coxcomb
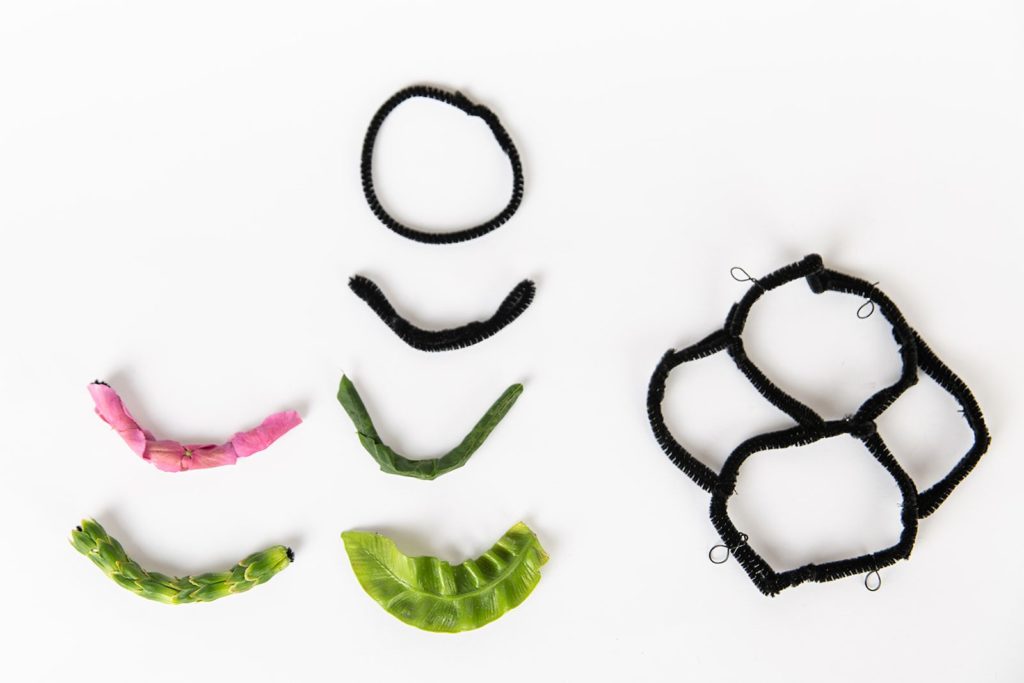
How to make the base:
1. Make individual circles with 6 pipe cleaners, by twisting the 2 ends together
2. Fold each circle in half

3. Connect 2 half circles by twisting some bullion wire: then secure another half circle, connecting it in the center of the 2 connected half circles
4. Repeat 3

5. Cut the last of the pipe cleaners in thirds
6. Connect the 2 sets of 3 half circles with the short pipe cleaners by looping them through the folded pipe cleaners and then twisting them
7. Secure 4 small loops of the thin wire (to secure bobby pins on)
Decorate the base:
Remember to use the cold glue sparingly!
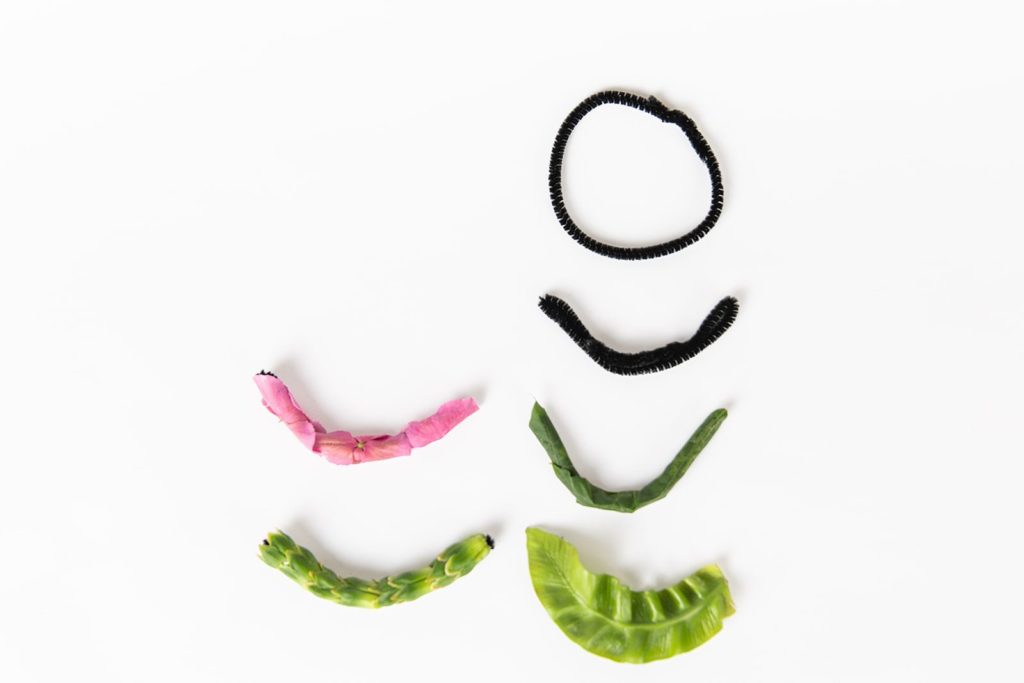
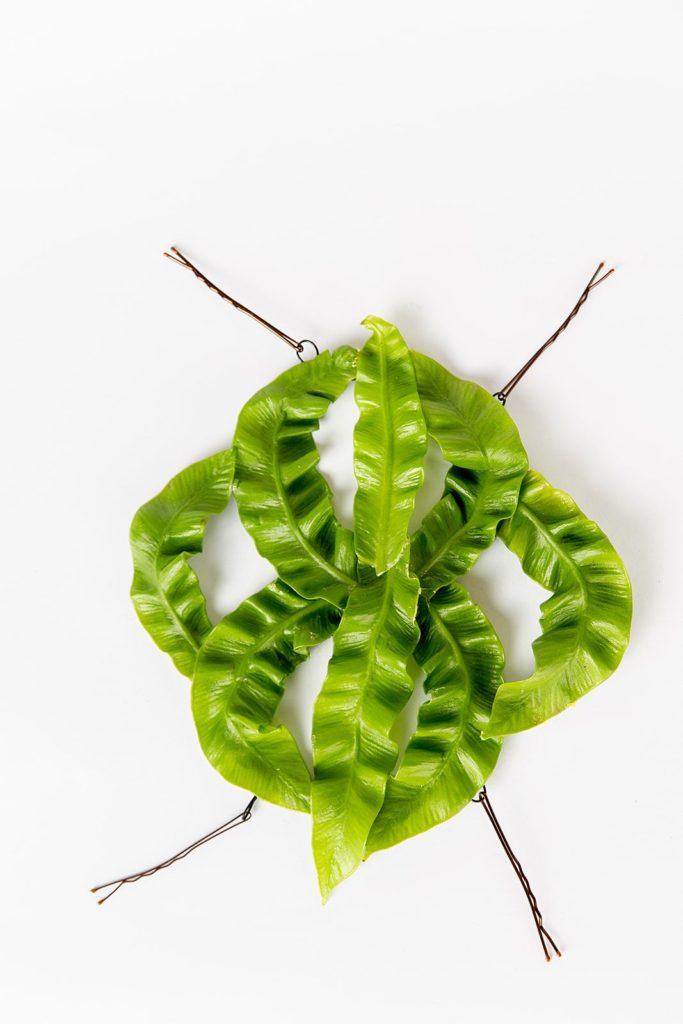
- Cover the pipe cleaners with foliage or petals. I glued leaves of the bird’s nest fern on the pipe cleaner on the bottom right in the image below.
- The other examples show the pipe cleaners wrapped with wisteria leaves (upper right), hydrangea blossoms (upper left) or calix of carnations (lower left) — any small flexible leaf or petals will do the trick.
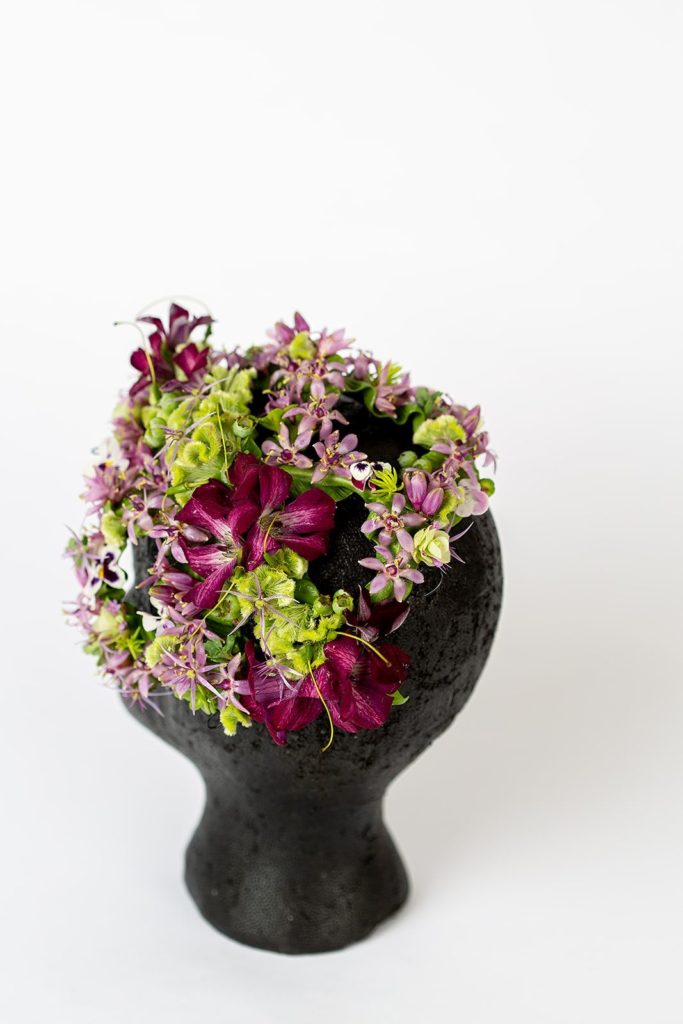
- I chose to cover the base of this fascinator with bird’s nest fern.
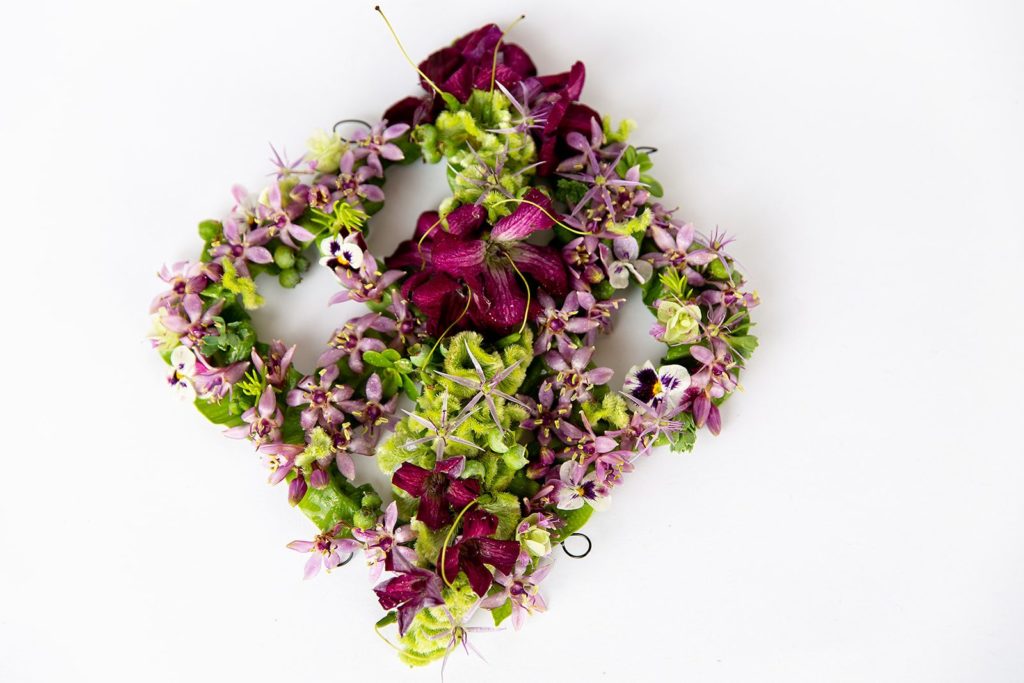
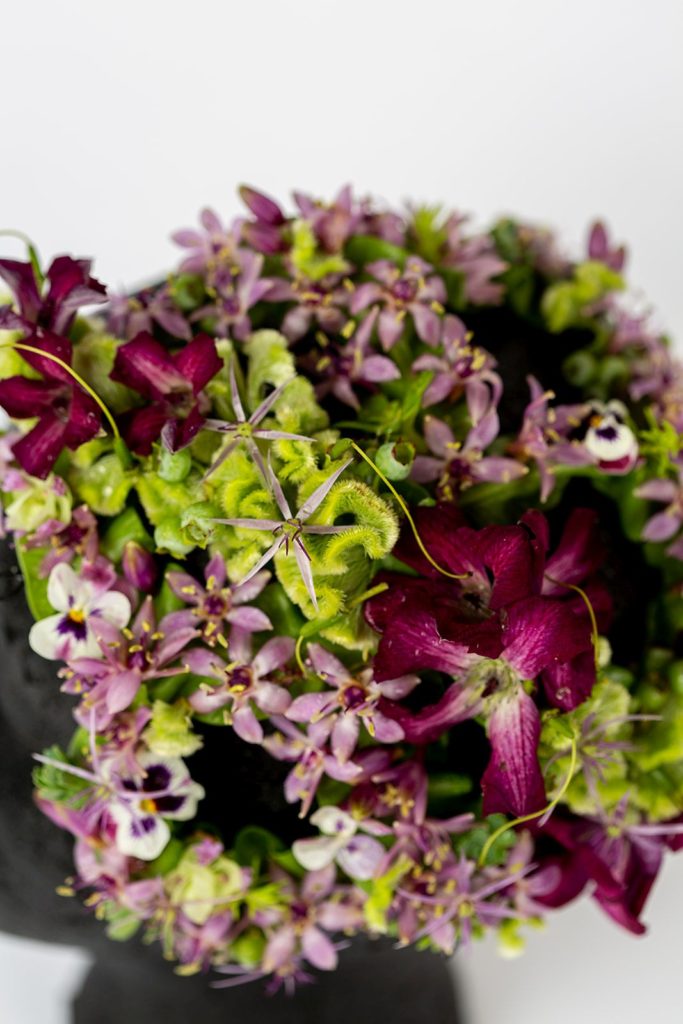
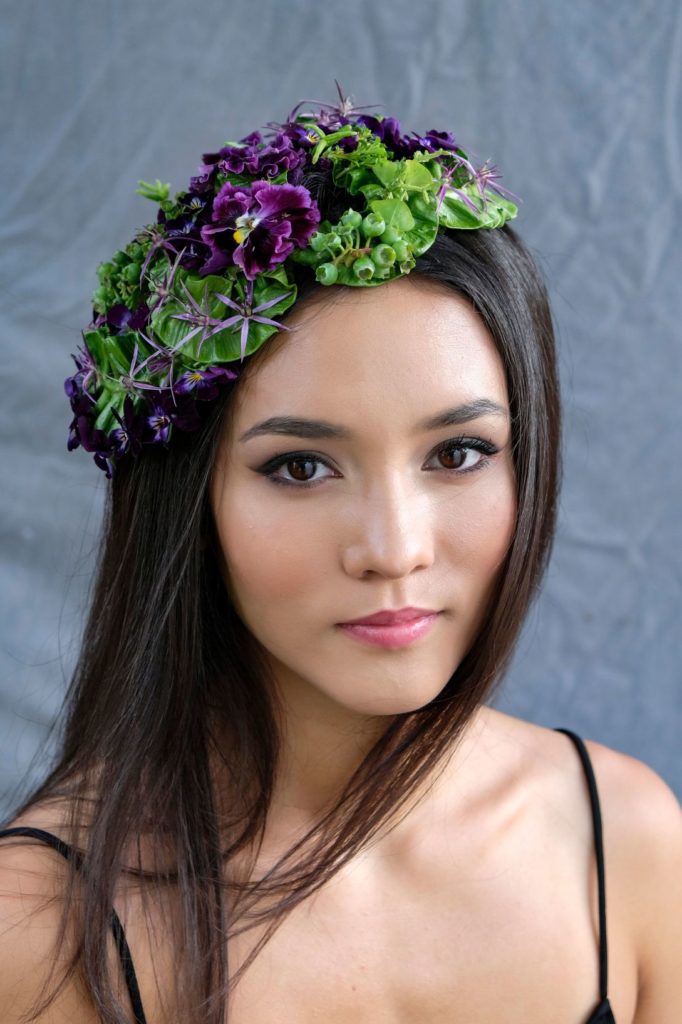
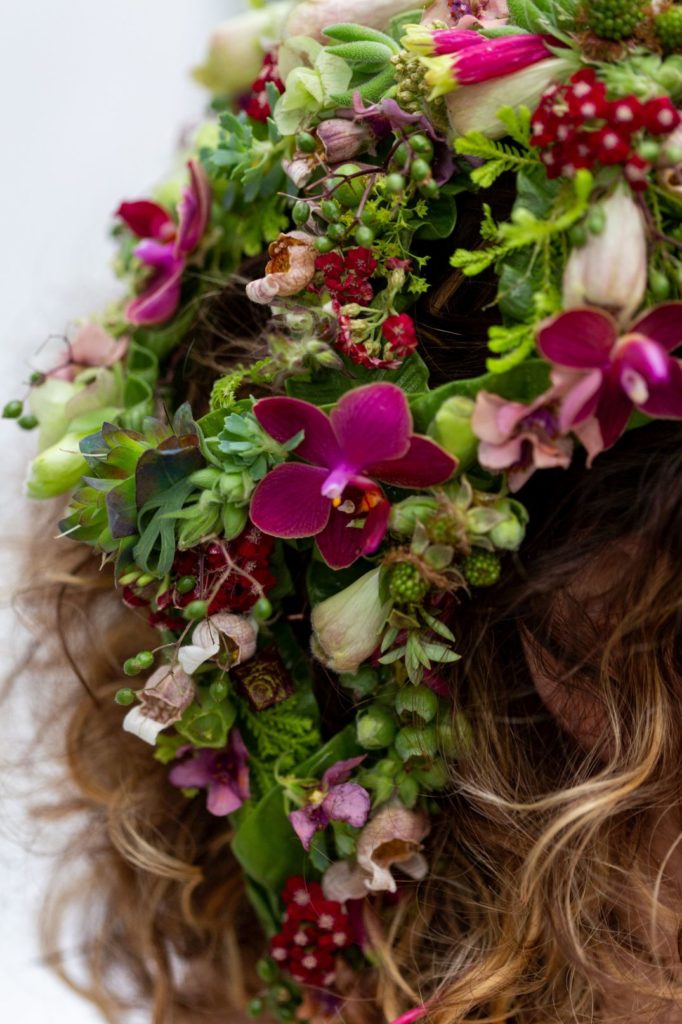
3. The two leaves in the center are covered with deconstructed cockscomb, small clematis, blueberries, blossoms of allium christophii, and stamens of rhododendron. The 6 half circles are decorated with blossoms and buds of eucomis, allium christophii, blueberries, sedum, small pansies, kent oregano, and snippets of coxcomb.
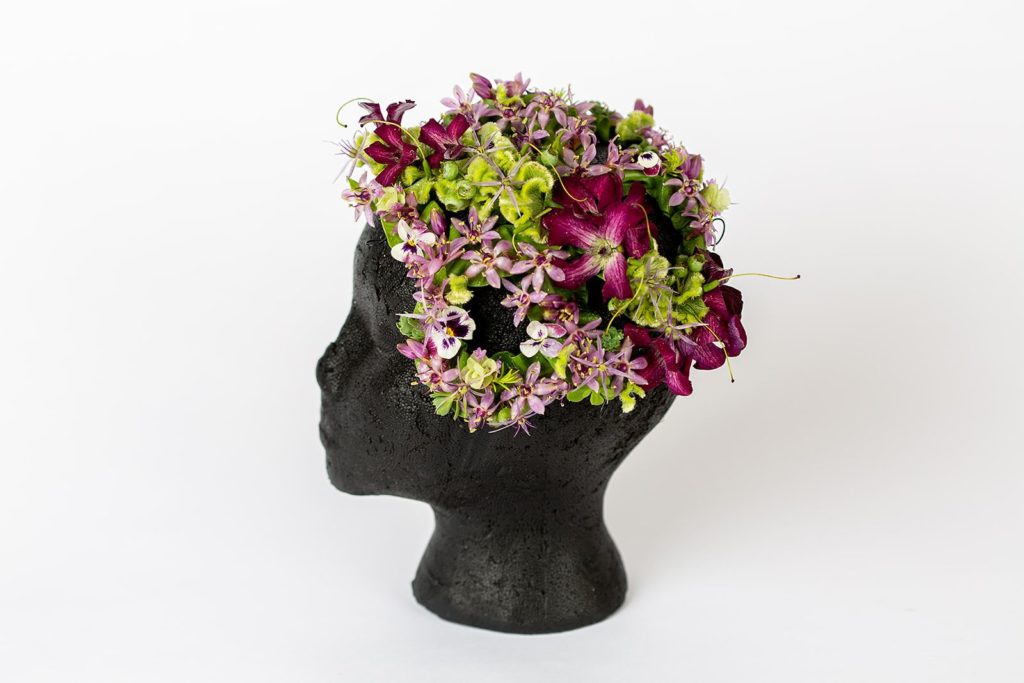
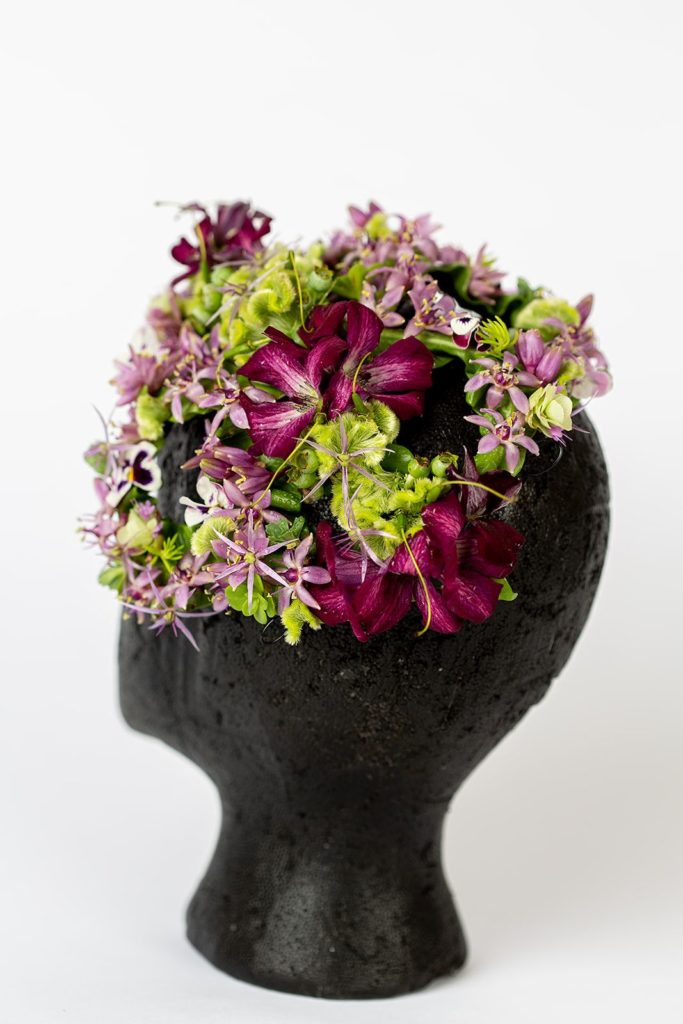
Place the fascinator on the head and secure it with 4 bobby pins
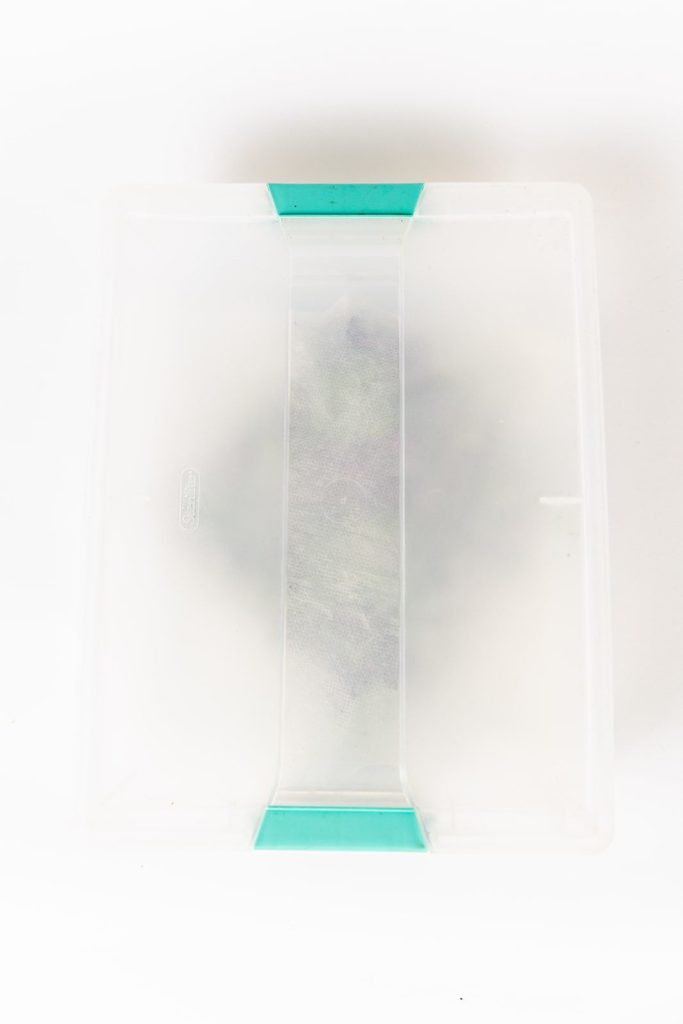
How to Keep a Fascinator Hydrated for Up to 5 Days
Two years ago I attended a workshop taught by the magical German designer Gregor Lersch. We learned how to create a hydration chamber for designs that had no water source.
I wish I would have known about this 24 years ago when I started my business. Instead of making corsages, boutonnieres and flower crowns in the middle of the night before the wedding, I could have made them on Tuesday. The method is so simple and it is a total game changer! It also allows me to use flowers that I never would have thought of using without a water source like sweet peas, pansies, lilac, honeysuckle and many more.
1.Cover the bottom of an air tight container with wet paper towels
2. After misting the fascinator with water, place it in the box and cover it with another layer of wet paper towels.
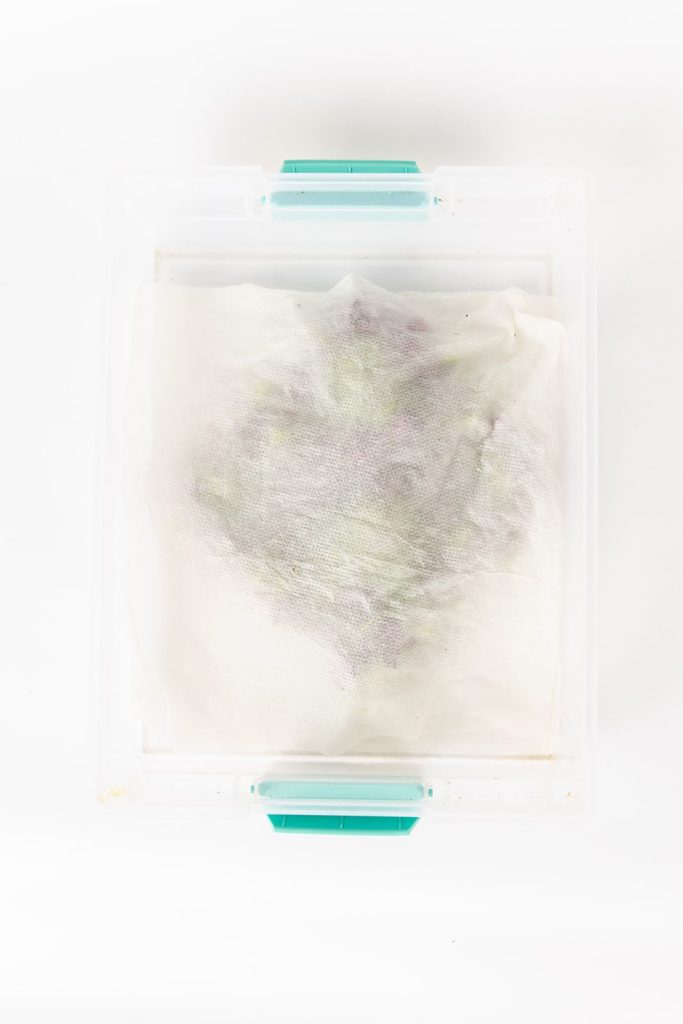
3. Seal the box. Put it in the cooler (or in a cool room). The moisture will hydrate the flowers perfectly and after 5 days they will still look impeccable.
This method comes in super handy for any design made without a water source. For large events, weddings or photo shoots that involve multiple designs, we can design up to 5 days before the event.
Another option is to hydrate the flowers in the airtight box for at least 24 hours in the box and then make the design (for example if you make a wired cascading bouquet).
If you make larger designs like headpieces or dresses etc, you can use a large plastic bag to store your design in after covering it with the wet paper towels and then sealing it with a tight knot.
PS: Do keep in mind that if the event happens outdoors on a super hot day, it’s a good idea to use less fragile flowers and lots of textures like seedpods, succulents and sedums and highlight the designs with a few flowers. Remember that on any given day the temperature in the sun will be about 20 degrees hotter than in the shade. So on an 85 degree day, the temperature will be 105 in the sun. No matter how well hydrated the flowers are, they will not do very well for several hours in that kind of heat. The bottom line is to use common sense!
A few more examples:
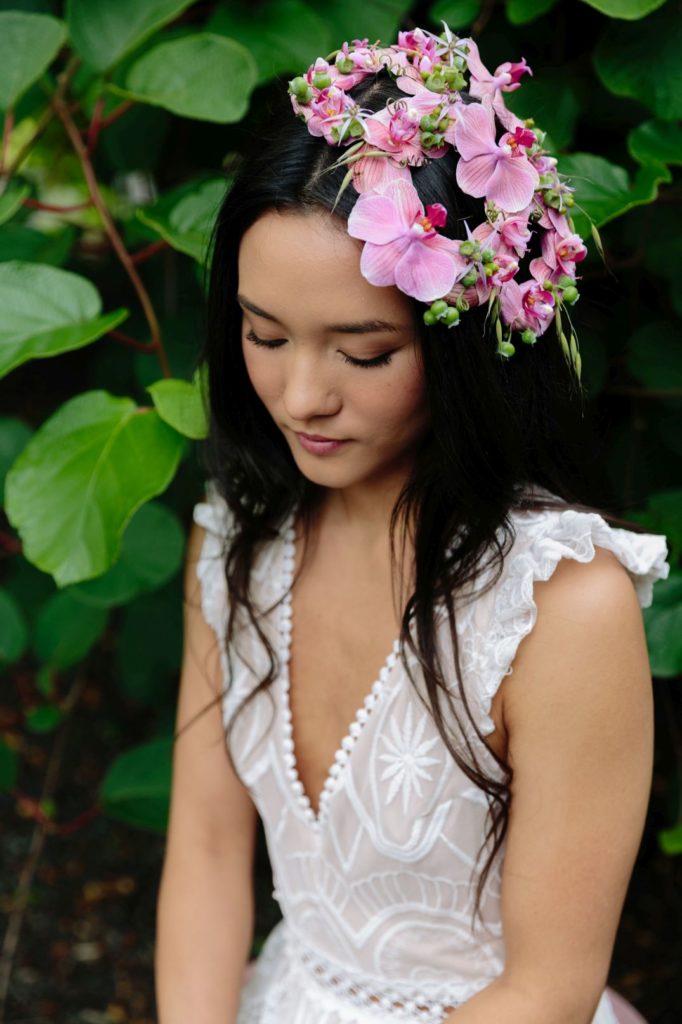
1. Fascinator with Phalaenopsis
The pipe cleaners are covered with the petals of the flowers and then are decorated with the throat of the orchid, blueberries, and snippets of grass; the 3 short pieces of pipe cleaners in the center are covered with an orchid.
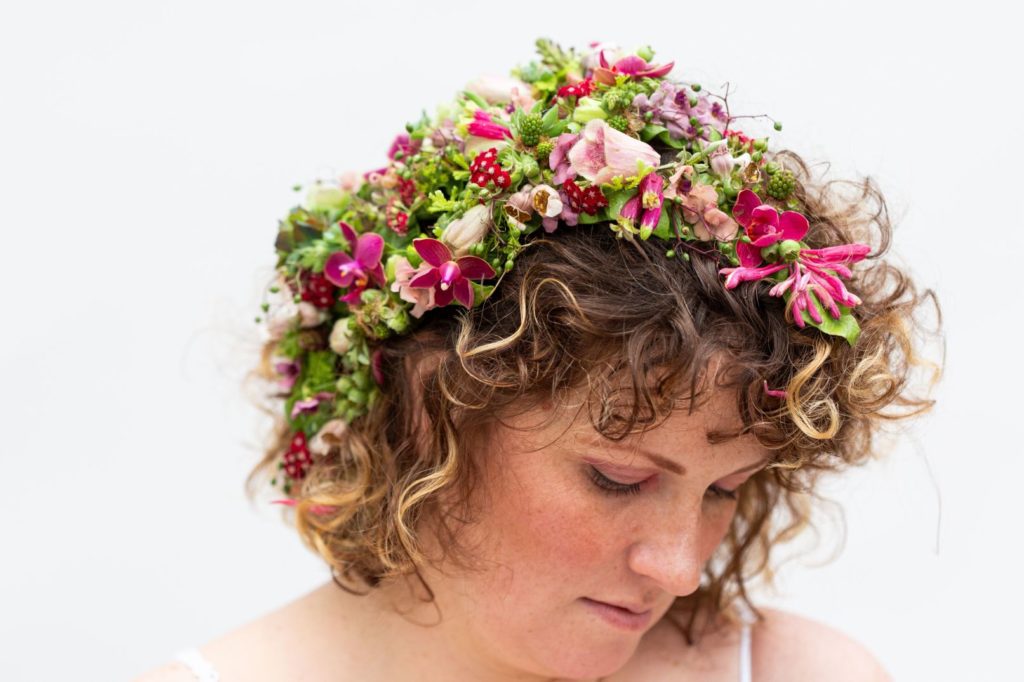
2. Fascinator with Pansies (photos Ted Mishima)
The pipe cleaners are covered with the bird’s nest fern and are decorated with pansies, blueberries, blossoms of allium christofii, and rhipsalis.

3. Larger Fascinator
15 pipe cleaners were used (row 1 with 1 pipe cleaner – row 2: 2 …row 5 : 5 pipe cleaners). The pipe cleaners are covered with bird’s nest fern and decorated randomly with honeysuckle, digitalis, mini phalaenopsis, yarrow, dichlostemma, blackberries, blueberries, elderberries, succulents, and sedum.
All images courtesy of Theresa Bear (except the pansy fascinator: Ted Mishima)
UPDATE: Congratulations to Alicia at Plant Design Events, winner of Wedding Wearables by Francoise Weeks! Thanks for your generosity, Francoise!
GIVEAWAY + SPECIAL OFFER FOR BB READERS
- Francoise is gifting her Wedding Wearables online course to one BB reader (retail value: $425)! To enter, simply leave a comment below before 11:59 pm PST on Friday, August 21, 2020. Winner will be chosen by random drawing and contacted by email. Giveaway open to ALL BB readers!
- Francoise is also offering a very generous discount on her Wedding Wearables online course for BB readers who don’t win the giveaway – or who can’t wait to get the course and want to buy it now! Click Here to get 60% off Wedding Wearables (use code BB2020, if prompted). That’s a savings of $255! Offer ends 11:59 pm PST on Saturday, August 22, 2020.
If you enjoyed this tutorial, you may also like our Pin Frog tutorial with Alyssa Lytle of Color Theory Design Co. Click Here to check it out!
Comments:
Leave a Reply
Share your Thoughts:
Subscribe and stay connected
This site may contain copyrighted material the use of which has not always been specifically authorized by the copyright owner. It is being made available in an effort to provide educational information about all things related to floral design and production. It is believed that this constitutes a 'fair use' of any such copyrighted material as provided for in section 107 of the US Copyright Law. In accordance with Title 17 U.S.C. Section 107, the material on this site is available for viewing without profit to those who have an interest in reading or viewing the website information for educational purposes. If you wish to use copyrighted material from this site for purposes of your own that go beyond 'fair use', you must obtain permission from the copyright owner. If your copyrighted material appears on this web site and you disagree with our assessment that it constitutes "fair use," please contact us and we will remove it from our site.
I love that this step-by-step is so detailed and full of information. Thank you Francoise!
The detail and delicacy of Francoise’ work is just amazing. Gorgeous stuff. Thank you so much posting this!
Thank you for this instruction I will definitely use it!
All of Francoise’s work is simply breathtaking!! Love it all!
Thank you for the detailed explanation. The floral fascinators are very beautiful
That is a fantastic post! The detail is incredible. And, the tip on how to store flowers for up to 5 days is invaluable. Thank you, Francoise. Bekki
I love all the fascinators! Can’t wait to make one.
I loved the idea of being able to make head pieces in advance ! Thanks so much for sharing ! Love from Brazil Bibi
I can’t wait to get more creative with wearables! I’m already addicted to flower crowns, I’ve gotta level up! Thank you for your inspiring creations.
Excellent tutorial & I love the hydration idea – also wish I’d known about that years ago!
I learnt something new today, will definitely try this mechanics in my future work! thanks for sharing.
Very well constructed tutorial. I love Francoise’s work.
That is so generous. I ❤️Françoise Weeks.
This is so ingenious. Love the selection of flowers to create the desired effect. Love Francois’s amazing work.
Thanks for sharing your knowledge and creations, your’e such a inspiration, Francois Weeks!
Thank you for sharing your knowledge and techniques. Absolutely Beautiful!
I love this so much! Another way to wear flowers in the hair that is more fashion forward than the flower crown. Absolutely lovely and delicate, I’m going to try this method soon! Thank you very much for the detailed instructions.
I love the step by step instructions and the pictures too! The visual really helps me to see what you’ve done to create this beautiful fasinator! Thank you so much for sharing your talent with us❤️
Thank you for the tutorial and helpful tips!
I absolutely LOVE these and this tutorial is perfect!
I can’t wait to make it myself!
These are gorgeous and I will definitely give this method a try. I have an upcoming wedding and someone may be wearing one of these!
I love how beautiful the piece is, very botanical, yet with a unique modern edge.
Thank you for sharing, the directions and visuals make it almost like being right there.
Love your work!
Amazing. Would love to learn more. Thank you for sharing this tutorial!
So I interesting and fun! Instead of casual Friday’s I think all florist should have fascinator Friday and post. It would so fun to see all the creativity. Thank you for posting. It was inspiring!
Incredible woodland style. I love the experimentation and the innovative use of flower parts.
This is gorgeous! I’m in stage 4 of lock down in Melbourne, Australia and desperately trying to plan my wedding for as soon as lock down eases. These ideas and creative botanicals are keeping me smiling!
So beautiful! Thanks for sharing all this information!!
Thank you for the detailed tutorial, I know what I’m doing this weekend!
It is pretty cool to see all the different mechanics Francoise used. I like that she is so open to answer any questions when asked.
Her designs are always so intricate and awe inspiring! Thank you for sharing this step by step!!
Thank you so much for the detailed tutorial! I need to give this a try! 💚
I never would have known how to do this! So creative!
Thank you for the tutorial! What an amazing way to create wearable art!
I would love to learn this technique, so beautiful!
These are beautiful and offer so many possibilities.
Gorgeous – thank you for so generously sharing this tutorial!
Such a treasure trove of inspiration & skill. Francoise is a wealth of information. I was fortunate enough to enroll in one of her online tutorials a few years ago and so appreciated her outlook & approach to floral design. Thanks for the generous opportunity & chance.
Thanks for sharing such great detailed step by step directions. I love any opportunity to learn a new technique.
Having seen Francoise do a demonstration at NC Art in Bloom, I know I’d love this. She’s a gifted teacher and artist.
Amazing page! So easy to follow along with and an amazing opportunity for free-lance floral designers on a budget. Will definitely be following for more.💖
I wasn’t sure about the structure, but what incredible results when you cover those pipe cleaners with flowers!!! Love!
So inspirational! Love the textures and whimsical feeling of these pieces.
What gorgeous work!! Thank you to Francoise for showing us how! I might get brave enough to try it out.
Love Francoise. Not only is she soooo talented she is also genuinely humble and kind. A trait hard to find in those with such great talent!
Love all the textural elements the most: the berries and seed pods, for example. Also love that the mechanics are simple and something everyone may have on hand, like pipe cleaners.
So unique and beautiful! Thank you…
The fascinator is such a great alternative to a crown. Love this!
Thank you got the detail! I am going to try this for one of my upcoming weddings!
Amazing tutorial on design and make. Thank you for giving me the inspiration to have a go.
These creations are some of the most beautiful I’ve seen , ever. My jaw dropped for real as wearable botanicals is a completely new concept to me ♥️
Yay! So so happy to have won Fracoise’s wonderful education course. She is simply amazing and such a trendsetter! Woo hoo! Thank you THANK YOU to you both!!
So beautiful! Thanks for sharing 💛